Imagine this: you are sitting inside your toasty house on a rainy day. You are watching your favorite TV show while drinking your favorite pumpkin flavored drink and then bam! It hits you, you should do a fall themed craft!
Very hard to imagine, right? It seems like very few people over the age of eleven do themed crafts but why is that? Wouldn’t you like to have a cinnamon scented pine cone wafting up a delicious smell, or a homemade candle that reeks of creativity? Well, you’re in luck because in this issue of the Kings Page we have an article dedicated to fall crafts that can elevate your autumn experience.
To get our students’ thoughts on the mashup fall and crafts I interviewed freshman Jessica Thompson. I asked Jessica if she considered herself an artistic person.
“I do consider myself an artistic and crafty person, I draw and animate a lot in my free time,” said Freshman Jessica Thompson, “I also write a bit.”
But when I asked if she had ever done any fall themed crafts the answer was disappointing.
“Not really, not fall themed crafts. The closest to fall themed crafts I get is pumpkin carving which I’ve just now realized we may not be able to do (due to COVID).”
It is safe to say that unless you are an elementary art teacher you probably don’t do, or even think about, crafts let alone fall themed crafts, but I am here to change that with a list (and instructions) of some fun crafts!
Craft number one:
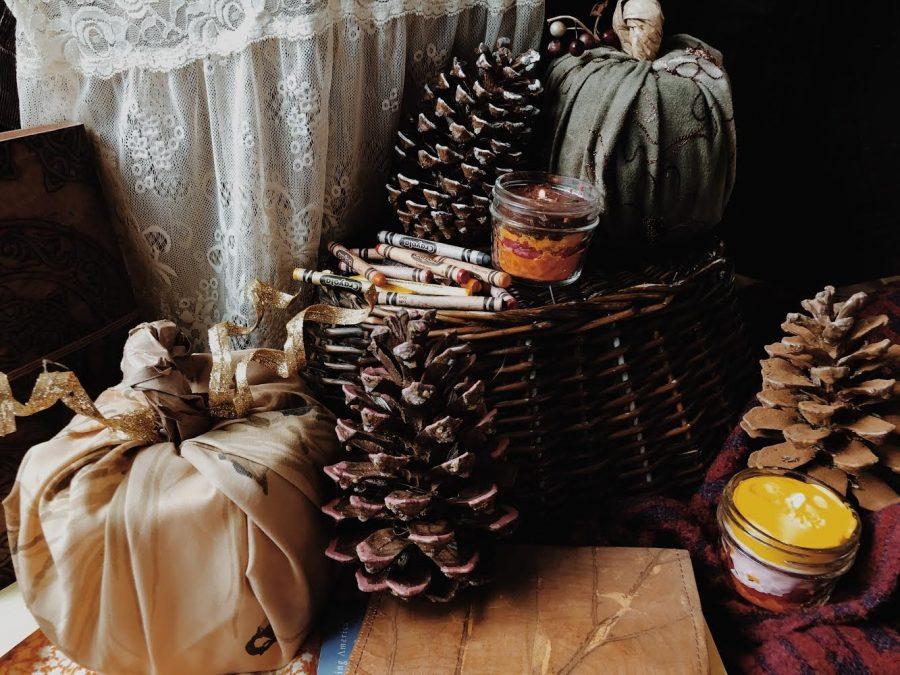
Scented pine cones! What you will need are a couple of pine cones (I snagged a couple from a local park), any kind of wet glue, a paint brush (you can also use a butter knife, popsicle stick, or anything with a spreading ability), a large ziploc bag, and ground cinnamon. If you use pine cones from the great outdoors make sure you clean them to avoid encounters with bugs.
- After cleaning the pine cone, spread glue on each of the pine cone’s scales.
- Pour two tablespoons of ground cinnamon into a large ziploc bag.
- Put the pine cone into the bag, zip it up, and have fun shaking up a storm. Stop shaking when all the pine cone scales are caked in cinnamon.
- Let the glue and cinnamon dry and enjoy a scented pine cone! This craft will not only make your house smell wonderful but it also looks extremely cute and brings the fall inside your house to celebrate the season.
Craft number two:
Homemade candles
Something fall is famously known for (or infamously, depending on your level of scent tolerance) are the comforting smells. Whatever your preference may be, we can all agree that roaming the lines of a Bath and Body Works looking for the perfect scented candle is not only a tedious task but one that usually ends in a headache and a slightly less full bank account. This craft is incredibly cheap to make and has an aroma that will leave you believing it is fall well into winter.
These homemade candles can take a long or short amount of time depending on what style you want to make. The materials you’ll need are:
- Crayons
- Wax
- Wicks
- Paper cups
- Scents (optional)
- Clay (this can also be replaced with tape or a very strong glue)
- Using the clay, attach the wick to the bottom of a jar.
- Peel off the wrappings of the colored crayon you would like to use for your candle.
3. In a paper cup, put equal parts of wax and crayons. Depending on the amount of melted wax you want, that will dictate the amount of crayons and wax you put. To make enough for one ½ inch layer in my sized jar, I used 4 crayons to the equal amount of wax.
4. To melt the wax and crayons, put the microwave out for two minutes, stir it (it should still be in chunks but slightly melted), and microwave for another two minutes. Stir it a little to make sure it is fully melted but don’t over stir or it will cool in the cup. For my candle, I did different colored layers so I melted smaller amounts of wax at one time. If you want to do a solid color candle, you will not only want to put more crayons and wax in the cup to melt, but you will need to melt it for longer increments in the microwave.
5. While stirring it add in your essential oils. If you are doing different layers only add a couple drops to each color. If you are doing your candle as all one color adds in all the essential oils you desire to the wax (the more essential oil you put in the stronger the scent will be).
6. Pour the melted wax into the jar. Let it cool until you can not make a fingerprint on the top.
7. For multiple colored layers repeat steps 2-5 until you have filled your jar with wax.
8. This craft does take patience because you need to wait between each layer to pour in more wax. Do not microwave all your wax at the same time or it will harden before you can pour them all in. Also, do not put your candle in the freezer to make it dry faster or it will crack (I learned this the hard way).
- Enjoy a custom candle that will not only bring in the light to your home but will bring in fall.
Craft number three:
Frosted tip pine cones
While pine cones are beautiful in their original, natural form, adding your own touch, or in this case tips, can give it a personal flare. All you will need is a pine cone, some paint, and paint brushes.
- Pour out your favorite color of paint, and then using a small paint brush, paint the tips of the pine cone scales.
- And that’s it! Now you’ve got a pine cone ready to out look all the other plain pine cones of the forest.
The final question is not only fall related but corona related. This craft is for all the people who still have hordes of toilet paper from the dark ages of quarantine. This craft is toilet paper pumpkins! While the name may sound strange I assure you it is something you will want to make. What you will need is a new role of toilet paper, 17” by 17” square of fabric, scissors, a plastic bag and a paper bag. While this does take more materials than the past crafts it is by far the cutest and uses materials that you would normally throw away.
- Cut your square of fabric into a circle. One easy way to do this is to fold it in half and then in half again so a quarter of the fabric is showing. Then cut from the bottom right corner to the top left corner at a circular cut. Open up the fabric to reveal a circle.
- Next you’ll need to secure the plastic bag around the middle of the toilet paper roll. This gives the role a more circular shape so it looks more like. A pumpkin when the fabric is wrapped around it.
- Once you have the plastic bag around the toilet paper place it in the center of the fabric circle. Tuck the fabric into the center of the toilet paper roll. It does not matter what side you start at, just make sure all the fabric can be tucked into the middle.
- Next, cut a large rectangle out of the paper bag. Twist it vertically so you have a long crinkly tub. Fold it in half and stick it in the middle of the toilet paper roll so it holds the fabric in place.
- And that’s it! Now you have a cute pumpkin that can be placed in your bathroom as an extra role secret role that has a festive flare.
I hope all of our crafts not only bring you entertainment but bring you creativity so that you can go on to make many things this season. While the virus has canceled many things it can not cancel creativity, so make sure to get crafting this season! If you make any of these crafts, make sure to post a picture and tag the Kings Page Instagram. Stay safe this season and have a fantastic fall!

